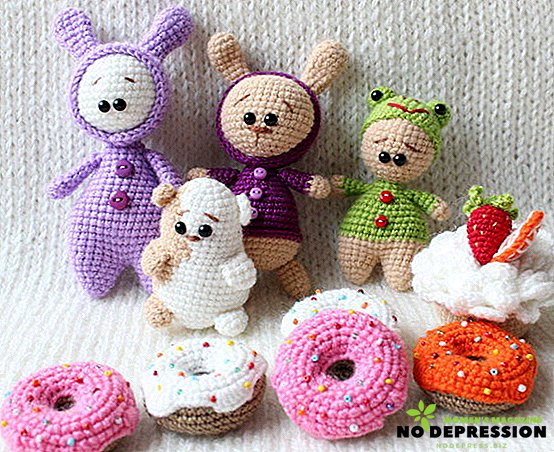
To date, knitted toys are gaining increasing popularity. Such crafts are mostly made with the help of a hook with their own hands. Therefore, such a toy with his own hand causes a considerable amount of positive emotions both in the child and in the needlewoman herself.
Before embarking on work, the beginning mistress needs to sort out the available knitting options and patterns in more detail.
Simple schemes for beginners
For beginners in the knitting business, it is recommended to start with simple products, such as a bun or a ladybug. To create a bun you need to do the following:
- to make two air loops, from the last type six "STBN";
- the second cycle involves knitting twelve elements in two;

- the third cycle is to knit one column without a nakid two in one. This cycle duplicates six knitting cycles. Each row from the fourth to the tenth is increased by one “sc”;
- the rows from the eleventh to the twentieth are knitted in series with one column of “BN”, and the twenty-first with eight “SBTN”;

- after the twenty-first row, the number of columns decreases. Thus, you get a ball that has twenty eight sequences.
The resulting ball is decorated with yarn (Kolobok hair), and is stuffed with filler.
To make a ladybug, you need:
- with the help of a red strand, dial two air loops, make five columns of “BN” from two components;
- proceed to each sequence with the "VP" of the rise, the second, third, and fourth element knit with two "sc". In this case, the third component is inserted into the previous loop.
- the fifth, sixth and seventh columns of the “BN” are embroidered with a black cross;
- tie the back loop to the eighth and ninth rows;
- fill the resulting frame with padding polyester and sew.
Crocheted Christmas toys (amigurumi)
There is a very large number of a wide variety of toys that can be crocheted, but especially popular are New Year crafts. The simplest option is considered to be a herringbone, even an aspiring needlewoman can tie her. To do this, follow the following scheme:
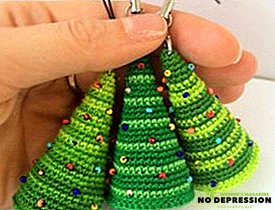 Take the thread and dial two hundred air loops (the symbol "GP or" VP "), knit a double crochet from the second loop (denoted by" CCH "or" CH "). there is a peculiar ribbon that fits in alternately, five “GPs” and one “CH”.
- With the help of white thread to tie another tape. For this, two hundred air loops are recruited, in the reverse order, link "CH", then produce one "VP", and then knit alternately four loops "CH" and three "CH" from one "VP". This action duplicate six reports.
- The upper part of the Christmas tree is made of five columns without nakida (abbreviated as "RLS"), while it is necessary to make four sequences. When performing the fifth sequence pico ("P") in each component. The sixth is the rapport, which consists of one fur or boucle loop ("BP") and one picot. The next strand fits into one loop, plus five double crochets, which in turn alternate with a looped loop.
- Next you need to make a frame of thick paper (cardboard), and in a chaotic order to glue the ribbons.
- To make the bottom of the product, you need six air loops to knit in the second order with pico in each component. Then one looped loop is made, one picot with increasing double crochets in each subsequent cycle, up to the 8th. The ninth row provides five “CH” to the first loop, and one “CH”.
- All the resulting elements are put together, and decorate with available jewelry.
 Take the thread and dial two hundred air loops (the symbol "GP or" VP "), knit a double crochet from the second loop (denoted by" CCH "or" CH "). there is a peculiar ribbon that fits in alternately, five “GPs” and one “CH”.
In addition to jewelry, you can use knitted balls, which can also be knit with your own hands using a hook.
Best of all, such decorations should be made in color, with various patterns. Also, the balls can be ornamented with small pompons, beads, tassels or fringe. If you fantasize a little bit, then from the received balls, you can make a Christmas-tree decoration in the form of a toy. For example, from three white balls, you get the original snowman.
How to knit other crochet toys
Japanese knitwear, called amigurumi, is very popular with needlewomen. Such crafts mainly symbolize nature. Thanks to this technique, you can do it yourself to knit small and cute animals that are perfect as a gift to a loved one, or simply as a toy for a child. Such crafts can be knitted with ordinary knitting needles, but often they are made with a hook.
Such crafts can be knitted with ordinary knitting needles, but often they are made with a hook.
To knit an ordinary but nice cat, you need:
- collect a number of air loops and one lifting loop, weave nine non-nakida columns ("SCN"), three components into one, unfold, weave eight and two "SCN" from one joint;
- then an air loop and twenty-two columns with no single crochet are made;
- then ten “sc”, skip and repeat;
- three “sc”, skip and repeat;
- From the fifth to the ninth cycle, thirty “RLS” is done with a decrease.
- further three, two and one "sc", with all the bars should be with a decrease;
- on the received element eyes of an animal are pasted;
- the cat's neck is made of two columns without crochet, skip, two cycles and three “sc”, and skip;
- the body is recruited from twenty “sc”, then two rows of four “sc”, and a pass;
The tail fits as follows:
- Six posts without nakida.
- Five "sc" with a recurring pass.
- Two cycles of five and six "sc" with repeated passes.
 In conclusion, dial a series of thirteen air loops. In this case, with the second loop you need to tie twelve "SBTN":
- From the nineteenth to the twentieth row, thirty STBNs are made;
- then three more columns without crochet, alternating with a decrease. In this case, each row must be subtracted by one pillar.
- the parts received are tightened.
If desired, the cat can be associated with a pad or other interesting accessories.
The scheme for knitting a hedgehog has the following form:
- weave a single crochet from six air loops and make six passes;
- From the third row to the tenth one “SBN” and one pass match. At the same time, each cycle adds one column;
- from the eleventh to the fourteenth row, sixty STBNs are made;
- from the fourteenth to the twentieth it is knitted in the same way as the previous three rows, only with brown threads;
- from the twenty-first row, eight STBNs and one decrease are made. The next five rows (from the twenty-second to the twenty-sixth cycle) are made with a decrease of one column with no single crochet.
Next embroidered face of a hedgehog, eyes and ears are glued. This knitted toy is recommended to decorate with beads or flowers.
Master class on knitting dogs
There are several options for crocheting this animal. However, the easiest way is when all the component parts of the crafts are knitted separately, after which they are stitched and tied with a stride step along the entire perimeter.
To bind such a craft, you must have:
- a thread of three colors. Best to take cotton;
- hook, the first or one and a half numbers.
Weaving dog is as follows:
- The muzzle of the animal is represented in the shape of a ball. Therefore, in the loop you need to knit six “sc”. Next, a peculiar extension is made, which provides for an increase in each subsequent cycle by six “SBTNs”. The second cycle matches one in each column from the last row, then in the third cycle after one, and after two. This process is repeated until the ball reaches the desired size, after which the thread must be cut off.
- Mordashka itself knits with double crochets. In this case, the first row fit ten "CCH". The following three rows fit in exactly the same way as the first, the only thing that needs to be added from both sides along the 1st "CCH". Starting from the fifth cycle, double crochets are reduced in the same order as they were added. The resulting oval is tied with a stride step.
- The next step is to weave the ears. To do this, initially should make a pattern of these parts on paper. Then make knitting columns. Moreover, their number is adjusted according to a pre-made pattern. After the part is completely ready, it is necessary to tie it up with shark step.
- The parts obtained are stitched together with a usual needle and thread.
- Plump eyes, triangular nose, mouth and antennae are embroidered on the attractive face.
A white thread can be attached to the top of the finished toy so that you can hang it in the right place.
A white thread can be attached to the top of the finished toy so that it can be hung.
Some more schemes for creativity