Coniferous forest is a real treasure trove: trees, pitch, flowers, mushrooms and berries, as well as oxygen and aromatherapy, it gives a person many other useful and interesting things, including all sorts of "tricks" that become the basis of various DIY articles from the series "DIY ".
Adults and children are very interesting and useful to engage in joint work of this kind: it develops not only fine motor skills of fingers, but also observation, artistic taste, imagination. One of the types of raw materials for such needlework are the most common cones - spruce, pine, cedar.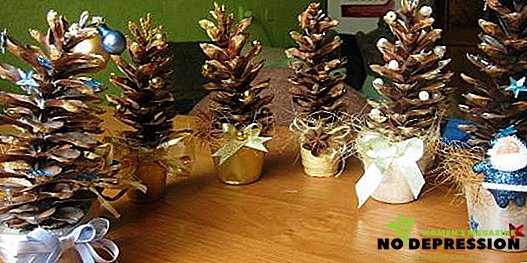
Having added paper, plasticine and other auxiliary materials to them, you can create a whole gallery of all kinds of exclusive souvenirs. Exposed to the shelf, they will serve as an original decoration of the children's room, and you can also give them to friends and acquaintances. What can make crafts from cones with your own hands - you ask.
We offer to hold a small master class on making such gifts. Probably, some ways to work with the fruits of conifers are fairly well known, but perhaps some of them will become for you a kind of know-how.
On the other hand, there is nothing particularly difficult in such handicrafts - it is quite possible not only for father and mother, but also for children of primary school and even preschool age.
Step by step instructions, schemes for making children's crafts with their own hands
Zoo of cones
From spruce and pine cones, you can create a zoo. For example, who can live in it.
Chanterelle sister
Looking for:
- 2 large spruce cones;
- 3 black beads;
- plasticine orange.
 Both blanks need to be cut into pieces: one - in half, and from the other to separate the third part.
We depict the head: roll out the orange cake, then take that half, which resembles a cone, and carefully stick it around to make a snout.
Above the muzzle, on the wider part of the cone half, you need to stick a pair of triangular clay ears.
We make the "expression of the muzzle": the spout can be built from a small black bead, from a pair of the same beads the size of a little smaller - eyes.
 If there are no beads, plasticine will do as well. The fox's head is ready.
Then for the remaining half - the body, placing its scales down, molded plasticine circle, to "put" on his head.
The same circle is attached behind the body - where the base of the tail will be. The tail is a smaller part of the second part.
 Now, looking at our craft, everyone will guess about her "fox essence".
It remains to apply the final touch.
Again, take the orange clay and roll out on four sausages: a pair of short and plump - hind legs, a pair of longer and thinner - front.
Attached to the body in the appropriate places. Patrikeevna out - at least where.
Bunny Jumping
 The hare's head is a chestnut, to which ears of plasticine are stuck (color - at the request of the "sculptor").
On the "front" side we draw a muzzle: two flattened white balls - cheeks, above them - eyes (blue or green), between them - a black nose, under them - a red tongue.
You can make an oblique antennae from the bristles by pinching an old toothbrush. Also with the help of plasticine fasten the head to the body - most of the second blank, left over from the fox.
According to the method of manufacturing plasticine hare legs are similar to fox. Sweet couple!
Clubfoot bear
For Toptyzhki need the following:
- 6 cones: one from spruce, and five pine ones, four of which are small and partially open, and one larger is completely, and its shape should be round;
- A piece of light birch bark;
- black peppercorns;
- 3 acorn caps.
 The fruit of the spruce will become the trunk.
Four half-open pine trees - with paws, and opened to the end - with the head.
The scales of the parts are neatly lubricated with glue and joined in such a way that they come one under the other.
Ears and a nose are obtained from acorn "berets".
The tip of the nose is made from pepper.
"Pepper" eyes for greater expressiveness are glued to the light bark base.
Hedgehog with apple
It will require only one pine cone and pieces of clay of different colors: red, green, light gray, black and brown.
 We make an elongated cone-muzzle from a light piece of plasticine mass, sticking it to the base of the cone. With a wooden toothpick, we make holes on the face in the places where the eyes and the tip of the nose are.
On the nose we make a ball of black plasticine, giving it a pointed shape.
The eyes of our hedgehog are brown, i.e. brown. We attach sharp ears of the same color to the muzzle to the finished hedgehog physiognomy. Well, let alone a three-year-old child be able to blind from an apple with leaves.
Crocodile from the river Nile
From a pair of tiny cones — a fairly long spruce and oblong pine, connected by bases — a very nice crocodile with plasticine eyes can turn out. For greater similarity, parts can be painted green.
Emperor Penguin
 The body of the Antarctic native is a spruce fruit with a cut off tip (small piece).
The head is a ping-pong ball on which a black cap and eyes are painted with black paint. Mounted on the glue.
Beak and legs - from red plasticine. You can stick a black paper coat on the penguin and make the tummy white.
But you can not touch anything else - it will still be beautiful.
gold fish
For the fabulous Pushkin's heroine, one needs a long and fairly fresh fir cone, which we split in several places with a sharp knife and paint with golden paint, as well as a set of parts from dense shiny foil: eyes, gills, fins.
We glue the eyes and gills to the head, attach the dorsal and ventral fins, the tail to the body.
Done - you can make all three wishes at once!
Cones, matches, stomachs - it turned out man
We move from animals to men, who are not at all difficult to make from the above mentioned pine-fir material and small acorns. Such crafts from cones and acorns are perfect for schoolchildren.
Naturally, the coniferous “fruit” will be in the role of the body, and in place of the head there will be an acorn: after all, it has a remarkable hat, worn by nature itself on the acorn head. Here are some samples of such "folk".
Gnome
 In the open pine “spreading out” we cut off a part of the top and string an acorn on it with a piece of hard wire, or simply glue it.
Head for the gnome choose such that her tightly held beretik.
Paint or felt-tip pen draw eyes and mouth on the little face. The handles and legs of a fairy-tale creature are also made from wire, or simply from thin, but non-fragile twigs, or matches.
“Shoe” the gnome in shoes made of acorn caps - they will look good and give stability to the figure.
You can also use the cut tops of small bumps in this role.
Skier
Putting a spruce trunk with an acorn head on a pair of plastic counting sticks, or wooden ice cream spatulas, painted in a bright color, and giving her two hands in toothpicks, we will get a remarkable athlete.
A shaggy wool thread, knitted around the neck, will serve as a wonderful scarf for our skier. You can also depict a whole family of such people on a ski trip.
Cedar angel
 From the fruits of cedar you can also build something curious, although working with them is somewhat more difficult than with spruce and pine cones. Consider a children's crafts of cedar cones, which can be made by hand. Here, for example, how to make a Christmas Angel tree decoration.
The body will be a cedar fruit with the widest “ass”, to the upper third of which a pair of paper wings are glued (not necessarily white — possible colored, for example, green — the angel of the forest).
A ping-pong ball or a foam ball is suitable for the head. A face is drawn on it with a felt-tip pen, then a nimbus is fastened around it - the same color as the wings. Thread, for which the little forest will cling to the tree, glue on the back between the wings.
Christmas wreath
Recently, the Russians adopted the old Western European custom - to decorate the house for Christmas with festive wreaths. Usually a wreath is made of fir branches, but such a wreath can also be made of pine "pine cones", foam plastic and colored paper. This is how this hand-made piece of cones is made.
Prepare a cardboard horseshoe template, as big as our Christmas wreath, then cut the horseshoe out of a thick sheet of foam. After wrapping it with a pink or red satin ribbon, the ends of which need to be glued so that the braid does not come off, put the blank aside.
We take a brush and begin to paint the conical details with white acrylic paint - each scale separately. After letting them dry out, we attach each one to the horseshoe with the help of threads, thus closing its entire surface.
Green corrugated paper is cut into squares of 5 × 5 cm, on one side we cut blanks into narrow strips and wind them into a pencil. Then we turn the uncut side into a tube and dress it with a thread, and cut the paper petals slightly down and fluff it out - something like curly green twigs-needles turns out. They must be inserted between the snow-covered coniferous parts of the wreath.
We tie two more ribbons to the horseshoes' free ends, making them a bow.
The wreath is ready. To the top of the horseshoe you need to attach a glass Christmas tree horse and hang out your craft on the front door - let everyone who comes to visit you immediately feel the festive atmosphere.
Scale crafts
If the raw material is over-ripe and therefore unsuitable for "art", then it only seems: such a "thorn" can be disassembled into separate scales with the help of ordinary pliers, and work with them already. Thus, a variety of applications and panels, as well as voluminous crafts. We made the Christmas angel, now let's make the main New Year symbol.
The Forest Raised a Christmas Tree
For it we will need a cone - foam, or glued together from thick paper or cardboard, the size of which depends on the "growth" of our Christmas tree. The new year tree will look more magnificent, the more and thicker it will be located lumpy "leaves".
They are fixed with the help of a glue gun in tiers, on the principle of laying tiles, so that the cone does not shine in any way. After letting the tree dry well, gently cover it with green acrylic paint and sprinkle with sparkles - beauty!
You can carefully stick multicolored plasticine balls or another Christmas-tree imitation toy to the green scaly "needles". We will plant all our little animals under the tree, adding to them a couple of boletus with scaly hats. The whole composition can be installed on a wooden board and placed near a real Christmas tree-pine.
But that is not all
Of course, we have listed far from all the ways to make beautiful original crafts from seemingly useless garbage that lies under a pine tree and Christmas trees.
You can make baskets, vases, chandelier hangers and much more from cones with your own hands, which will not only decorate the interior of your home, making it unique and different from others, but also save on it.
And in conclusion - a few tips and little tricks related to working with this free, affordable and environmentally friendly material:
- It is necessary to work only with absolutely dry material.
- Finished products from cones and clay should be kept away from moisture, as well as heating appliances and fire.
- For durability, they need to be varnished.
- It is easiest to paint products with enamels that are sold in hardware stores in the form of spray cans.
Master crafts of cones with your own hands, invent new options, fantasize!
A few more ideas of crafts from the cones - in the next video.