Beadwork is a fairly common type of needlework. This activity has a lot of advantages: it soothes, develops fine motor skills and imagination, does not require large financial expenses and allows you to get a unique decorative item that can decorate its owner or serve as a gift for a loved one.
In addition, currently there are a huge number of varieties of beads, glass beads, all sorts of beads and accessories, which allow to turn this activity from a children's hobby or hobby into a real job. But it all starts small, and in this matter, on the way to mastery, you will need to learn the simplest things.
Tips for weaving beaded bracelets with your own hands
Now everyone has the opportunity to get all the information of interest at any time, but earlier, they shared the secrets of any handicraft with each other, drawing out schemes, methods and special tricks, the use of which guaranteed to give a good, beautiful result.
In beadworking, as in any other business, there are some peculiarities, following which you can get what you want with less effort:
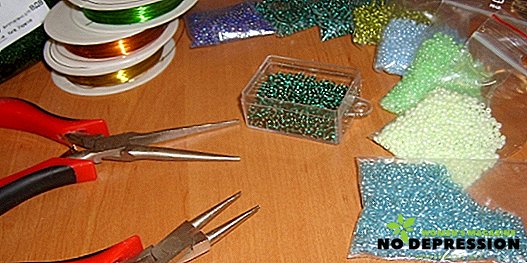
- weaving of beads of different colors will be easier if each color is in a separate container; in the mixed beads you have to look for the necessary beads, which takes time;
- it is better to pour beads for weaving a little into a container in one layer - it will be easier to string it;
- bracelets, necklaces, earrings and rings can be made on the basis of a thin special fishing line, a nylon or acrylic thread (cotton is too easy to tear) or the thinnest wire for needlework: the fishing line gives strength and elasticity, and folded in two gives rigidity, lightness and mobility, and wire serves as a reliable frame;
- weaving medium and complex techniques requires not only skills, but also tools: for example, stringing beads on a fishing line in a simple technique is possible without using a special needle, but with it the process is much faster and simpler;
- weaving on a thread without a needle is almost impossible, with the fishing line and wire there is such an option; the beadwork needle is somewhat different from the sewing one: it is very thin and has a flat eyelet with a small hole, so that it can easily pass into the hole of the bead;
- when purchasing beads, it is better not to be stingy and buy better and more expensive goods: very often cheap Chinese beads and glass beads have a lot of obvious defects in packaging, such as chipped beads or pieces of glass, as well as implicit ones: unpainted beads, beads with chips and small holes;
- Doing fixing or weaving a complex pattern, it is not recommended to lead a thread or a fishing line through one bead more than 3 times, otherwise the flexibility of the product will be lost, and if necessary it will be impossible to use this bead again;
- starting to weave the product and finishing, as well as in those moments when the thread or the line ends, it is important to make a good fastener, since such places are most vulnerable and easily torn if they are not properly fixed; the thread must be threaded into one or several beads 2-3 times in a row, the line is also fixed, after which you can gently singe its tip until a ball is formed on it, which will not allow the weaving to move and tear;
- weaving is more beautiful when all the beads have the same density: when making each element of a bauble or a new row of a wide bracelet, it is necessary to tighten the thread or fishing line with one force.


Beaded bracelet: the easiest weaving patterns for beginners
For beginners, the most interesting things will be to weave simple chains of beads that do not require special skills, but will show a nice result and allow you to learn how to work with beads, fishing line, master binding techniques, and so on.
The simplest version of a bead or bracelet will, of course, be a thread: for this purpose, they simply gather the required number of beads, fixing it at the ends. But it is too easy and does not give any freedom, except the choice of alternation of beads.

To weave a more complex bracelet, it is necessary to measure the fishing line 2.5 times longer than the wrist. Turning the thread in half, determine the middle and collect four beads, distributing them in the center. After the left thread to stretch through the far right bead, center the resulting rhombus.
Now on the left side dial one bead, and on the right two and again with the left thread go through the extreme bead on the right side. Thus weave the whole bracelet, at the end of a braided fastener, and inserting a ring from the other end. As a result of such a simple weaving, an elegant decoration is obtained, which can be either monophonic or of two or more colors.

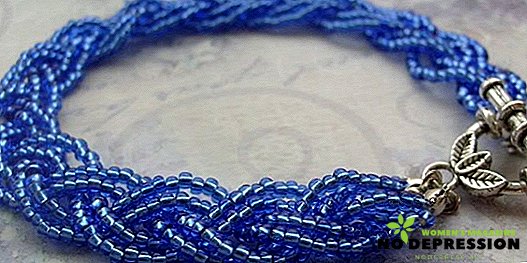
A similar weaving technique from a larger number of beads makes a wider bracelet out of the rings. For weaving on the fishing line, folded in half, recruit 5 or 7 beads. After that, the left needle passes through the extreme right bead, tightly closing the ring.
After that, on the left side they collect one amount of beads, depending on the initial number, and on the right side one bead is larger. Again, spend through the extreme bead of the left fishing line and so on until the end.
Thus, a beautiful chain of round elements is obtained. The lock at the end can be closed right over the outermost ring or priplesti initially metal ring.

Wide beaded bracelet: weaving scheme and step by step instructions
It is not difficult to weave a wide bracelet made of beads, but this exercise is quite laborious and long. Also, such a bracelet, depending on the width, requires a large amount of material, both beads and fishing line. But the result is worth it: at the end of the weaving, a unique product is obtained, and a combination of different colors or weaving according to the scheme allows you to make any pattern, starting from the inscription and ending with a full picture.
The scheme itself is quite simple. So, a bracelet is woven on one thread, which should not be too long, otherwise you can confuse it.
Since you still have to make the tack, you can take a fishing line or thread about half a meter in order not to confuse it.
Next, a knot is made at the end and is fastened through one bead. Get the required number of beads. After that, gain another bead for the next row. To make it easier to memorize the scheme, it is better to mentally assign the numbers 1 and 2, respectively, to the last and the penultimate bead of the first row.
So, thread the line from the first bead of the new row through the bead number 1 from the side of the bead number 2. Thus, a new row has been laid, but the line comes out of the first bead, so it is again inserted into the first bead of the second row.
After that, they pick up the next one, threading the line through the bead 2 of the first row and returning it to the 2 second row. So you need to weave the entire strip. Having reached the end, start the third row by analogy with the previous one.
The last row is woven twice, but without the beads, just with a fishing line, in order to better consolidate the result. Such a bracelet, despite the simplicity of form, gives a canvas that allows you to create different patterns.

Beaded bracelet with name
To weave a bead bracelet with the name, you need to create a pattern. To do this is quite simple, taking a sheet in a cell or graph paper and a pencil - colored or plain. A finished bracelet is drawn on a cell in a cage: each cell is equal to one bead; width will be equal to the height of the row, length - the length of the bracelet.
To find out the number of beads for the length of the finished product, you can measure the wrist with a typed thread of beads that will give the most accurate result. By counting the beads and drawing a rectangle, you can proceed to the scheme.
Considering that each bead is equal to the cage on the schematic drawing, it is necessary to determine the place of the future of the inscription.
Having decided on the place, you can start to make letters, fantasizing with font and color. Shading each cell with the desired color, form an inscription.
The lines are best done in 2 beads so that they are more noticeable. We need to weave a wide bracelet with the name according to the same pattern as the usual one, but watch each row in the pattern and add beads of the required color, respectively, to the drawing.

Beaded bracelet on the machine: weaving scheme
Weaving beads with the use of the machine is a great way to create durable, smooth and beautiful wide bracelets. Due to the mechanical tension of the threads and the ability to tightly lay the beads, this method gives a very even and structural canvas on which the most incredible patterns can be made according to the schemes.
The method of weaving the pattern is the same as in the weaving on the machine: drawing up a diagram or using ready-made, selection of beads, a set of beads of the desired color in the desired order.
The simplest machine is a wooden plank, into which small carnations are hammered from two sides in a checkerboard pattern. The width of the bracelet depends on the number of these studs, the length of the machine, respectively.
On each stud tied a strong elastic thread, as it should be fastened, and then tighten and fasten on the opposite stud. Thus, it creates the necessary number of threads for the desired width of the bracelet.

More complex machines allow you to distribute the threads with narrower gaps, thanks to a wooden comb, and also give the desired tension, thanks to the rotating rail.
To start weaving, measure the long thread, which is fixed at the beginning of the first thread of the machine knotted. Beads are gathered on the thread, in the amount equal to the number of threads minus one.
A string of beads is carried out under the threads of the machine, distributing the beads in such a way that each occupies its own cell between the threads.
Holding the string of beads, remove the free end of the thread upward, insert the needle into all the beads and drag it along with the thread. Next, dial the second row and repeat the procedure.
Thus, dopplet to the end. Having finished the work, the thread is carefully fixed, after which the bracelet is cut from the machine. The edges can be decorated with a variety of images, depending on the fantasy of the author.
Other patterns of weaving bead bracelets
In this section I would like to consider some more interesting examples of bracelets that are woven quickly enough.
- Bracelet in the technique of "eight".
To create a pattern, you must fasten a knot on the fishing line and collect 12 beads. Thread the end of the line through the first bead from bottom to top towards the knot. Further, 6 beads are gathered, after which the line is threaded through the fourth one, if you count clockwise from the upper bead. Further, 6 beads are also gathered and are drawn through the bead, which will be the fourth in a row from the lower bead. So weave to the end of the bracelet.
- Fine mesh of beads.
Such a net is woven according to the technique of one of the simple bracelets described above, however, thanks to the combination of several bands, it looks like a solid canvas and is very effective as a bracelet, as well as jewelry for clothing, necklace, bookmark and more.
It is woven in two ways: either on two or on the same line.
Option on one thread: the initial number of beads can be any, depending on the desired width of the bracelet. Having gathered 8 beads, you need to fix the thread knot in such a way that there is a gap between each bead, which is equal to its width.
Next, thread the end of the thread into the top of the beads, dial another one and thread the needle into the second bead of the first row, dial the next bead and repeat the operation until the end of the row. When moving to the next row, you do not need to thread the thread into the first bead, but you need to pick up one new one and thread the needle from the top to the first bead.
Weave further to the end of the row, and at the end repeat the initial operation. The fourth row weave, as the second, and the fifth as the third, repeating such a sequence.
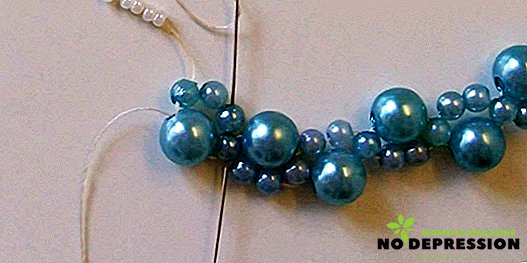
The two-thread technique implies that at first a chain is woven using the technique of a simple rhombus bracelet, and then the following is done: the ends of both threads are led to the top side bead; three new beads are gathered on one of the lines, the second is left lowered from the second row beads, while the other line closes all four beads into the ring, including the side bead, passing the thread through it from bottom to top, dragging the third bead through the diamond.
Then they pick up one bead and draw both lines through it, crossing them. Then one is carried out through the side bead, and another two are put on the other. In the extreme of these two, insert the scaffold on the left, and enter the right one in the next side bead. Weave so all rows. You can also weave a narrow bracelet with such a pattern on the technique shown below.

Above, we looked at the patterns of bead weaving for beginners. Having learned to weave the most simple products, you can gradually try your hand at more complex techniques. Try it and you will learn how to create beautiful jewelry for yourself and your loved ones.
In the next video - the idea of how to make a very simple and beautiful bead bracelet.