Bows - perhaps the most popular and affordable type of jewelry. They are to face the small and adult fashionistas, hairstyles that with the help of lush ribbon "bouquets" become more elegant.
Now the stores sell ready "stuff" of this type for all occasions. But, first, "consumer goods" is far from perfect: one can never rule out that the purchased jewelry will be fragile and "fail" at the most inopportune moment.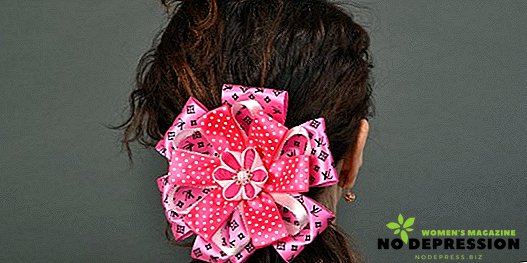
And secondly, the thing made by hand is not only cheaper, but also “more exclusive”. But how to make a bow with your own hands?
There are many ways of making various decorative gizmos, and to master them, neither special skills nor any special tools are required. First of all, they need the ribbons themselves, as well as scissors, needles, coils, and sometimes glue to fasten parts.
They tied a ribbon with a bow ...
Classic buns, tails and pigtails intercepted by a rubber band or barrette are very comfortable, but too simple types of hairstyles. They quickly "become boring," and the girl / girl, as it is sung in one old song, "I want something like that ..." A bow will help you to add a festive hairstyle.
It is quite simple to tie ordinary bows on hair - even junior schoolgirls can do it. But in order to celebrate a special holiday - a birthday, September 1 or a New Year matinee - to decorate the girl's head more original, you will have to try a little.
Let's try to make bows of ribbon with their own hands. Here are options for such a "crown".
"White diamond"
For one such miracle will need:
- White tapes:
- 1 m - from nylon, 8 cm wide;
- 0,6 m - from the atlas, 5 cm wide;
- 1.5-2 m narrow (no more than 3 mm) satin ribbons;
- Rezinochka for hair.
 In addition, to make a bow of satin ribbon with their own hands, they will need: a lighter, scissors, a needle and a reel. You can use both regular cotton sewing and polyester threads with a cotton coating - they are as thin and easy to sew, but much stronger.
To begin with, we will make blanks. Broad bands - both kapron and satin - are ironed and cut into 2 equal parts. Cut off the edges immediately with a lighter.
 We start making our jewelry.
The first half-meter nylon segment needs to be gathered on a thread, having passed it in the middle, then pulled off, having collected in the form of a rose - it will be at the top.
We fold the second piece of nylon in half lengthwise and also assemble onto a string, departing about 0.2 cm from the bend. Shrink, it turns out the flower with petals. In the middle we leave a small hole - this will make the diameter more voluminous.
We fold the thin ribbon with eyelets and place them on the petals, positioning them so that they protrude slightly over the edges. Each loop is fastened with two or three stitches. Detail number two is ready.
 Now let's do a wide satin ribbon. We take it by the ends and fold them to the middle, so that they lie on each other a little overlap (no more than 1 cm).
If the fabric has both the front and the reverse side, you need to ensure that the wrong side is inside. We sew, trying to make the seam lay exactly in the middle. Shrink and wind the middle thread 2-3 times, it turns out "butterfly".
In the same way, we make another same butterfly, cross-wise over each other, and sew in the center. This will be the basis.
 We leave to the finish line and connect all three parts: first satin, then "daisy" with thin eyelets and, finally, a white rosette. Details can be glued together, or sew - as someone seems better and safer.
A rezino is stitched to the satin substrate, with which the entire structure will be mounted on the head of the little princess. The magnificent "royal crown" - about 12 cm in diameter - is ready, you can go to the ball!
"Sweet couple"
These magnificent, but small balls can decorate small braids or "tails" for each day. Need:
- kapron strip "favorite" color with a length of 3 m and a width of 10 cm;
- two round pieces of soft leather, felt or other dense non-loose and not stretchable material - ø about 2.5 cm;
- Caton PE (polyester) in tone tape;
- fine needle;
- round "hat" gum - about 40 cm;
- two beads of the same color as the future bows, with a hole of such size that they can be strung on an elastic band.

Kapron is prepared in the same way as in the first case: ironing, separation in half, firing edge. The half is folded in half (in length) and sewn with small stitches at a distance of 0.3-0.1 cm from the bend - the closer, the better. Then it must be "collected".
It is better not to wait until the end of the kapron strip, but to do it gradually, flashing and collecting small sections. At the end, the bow must be firmly, but gently pulled off, trying not to tear the thread.
The strapped workpiece is twisted in a spiral and stitched along the edge, assembled into an accordion. Stitches should be durable, but loose, not tightened to the point. The result should be something like a slightly shaggy nylon ball.
 Making a mount. A bead is strung on the hat gum, which will help to fix the bow on the pigtail more tightly. Then the rubber band is tied into a ring with a diameter of 5 cm. The ends of the knot (not more than half a centimeter) are melted with a cigarette lighter. The elastic is stitched in a knot to the Bantu, a pair of stitches on one and the other side of the knot. At the same time try not to grab the folds, working only with the assembly area.
We take a prepared leather or felt circle and make a longitudinal section in the center, about 1 mm long less than the diameter of the bead. The ball is passed through a circle, which is tensioned on an elastic band and secured with silicone glue at the junction with the base of the product.
Finally we will try to arrange the folds so that it looks like a small fluffy ball. Couple to him is done in a similar pattern.
Flower on the barrette
This decoration is quite suitable for a young girl - both from the age category of teenagers, and those who are older. Attach it to the hair is not difficult.
For manufacturing, besides the previously listed (several types of satin ribbons of different widths and colors, needle scissors with thread, etc.), you will need:
- the usual school line;
- strip of white cardboard;
- button "with a leg";
- clip for hairpins.
Consider step by step how to make a bow on a hairpin with your own hands. To begin with, we will make two rectangles of cardboard: 8 and 6 cm wide (the length is not important in this case). With the help of the ruler we find and mark the middle of each.
 We take the widest strip of fabric and wrap it around an 8-inch-meter strip of cardboard, crossing the ends so that the crosshairs exactly match the marked median line.
Mark the place on the ribbon with a pencil and carefully remove the fabric from the cardboard strip, holding it with your fingers.
Then sew along the pencil mark with a “needle forward”, gently weighed and several times pass the needle through the center in order to hold it together, and set it aside.
 Taking a detail of a different color and a smaller width, we wrap a 6 cm cardboard template with it three times.
The coils should lie close to each other, but not overlap. Again, make a pencil mark in the center, remove and stitch, as well as the first part.
A narrow strip should be brighter than the first two to form a contrast with them, and about 8-10 times narrower than the widest.
We wrap a larger cardboard blank with it and, removing it, we tie up the resulting bundle in the middle with a string. We attach it to the first part, straightening and fluffing the loops. After that we sew both.
 We take a new piece of narrow ribbon and string a button on it, which should cover the middle.
We tie this piece with this piece, trying to make the button fit exactly on the center, closing all the fastening details. Turning the decoration, tightly tie two knots and melt the tips.
We attach the finished decoration to the clip with a sealant, and then, letting it dry, we additionally sew it, passing the threads through the holes in the barrette.
Little tricks
So you learned about various manufacturing techniques, and from now on you can make any beautiful ribbon bow with your own hands. And now - a few tips that will help you quickly and accurately cope with all the above arts.
It is better to iron with a slightly warm dry iron (without steaming). At high temperatures, the fabric, especially nylon, may suffer, and moisture sometimes leads to the formation of stains on its surface.
You need to stitch and collect a bow on a double thread - this will help avoid a cliff when tightening.
To gently melt the edges, it is better not to hold the fabric in your hands, but to lay it in a thick book, just sticking the edge out. Additionally, all kinds of beads, brooches, silver threads and other inexpensive costume jewelry will help to decorate the ribbon socket.
And another version of the beautiful hair bow hairpin is in the next video.