The crossbow is an ancient throwing weapon that the Romans invented. According to its characteristics, it looks like a bow.
At present, a crossbow is not used in any army in the world, it is sold in gun shops as an exclusive rare book, the cost of which sometimes exceeds a thousand dollars. Therefore, such products are very often decorations.
However, you can do it yourself imitation of such weapons, which will be the perfect outfit for any boy. In addition, a toy crossbow can be made from almost any scrap materials. Also, do not forget about security measures, as this product, although not professional, can cause significant injury to a person.
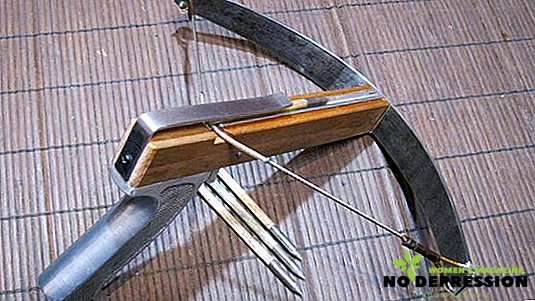
Homemade wood crossbow
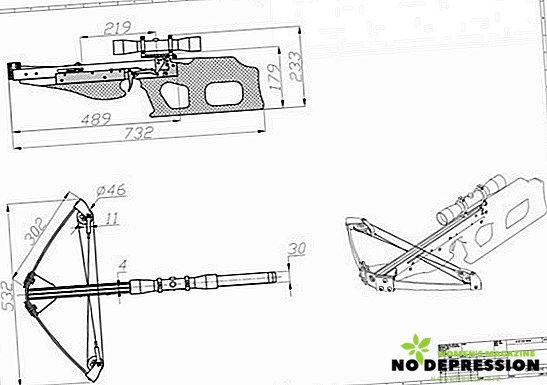
In order to personally assemble a crossbow, it is necessary to make each of its parts separately:
- Bed. It is the main element of throwing weapons. For this part, it is best to choose wood of viscous species, such as birch, ash or walnut. Many craftsmen make a bed of metal, and then set it strips of wood, this design is durable, but difficult. To make a bed, you need to prepare a thirty-millimeter board. After that, to extrude from it a kind of butt. A special groove is formed in the upper part of the cut butt, by means of which the direction of the arrow will be adjusted.
- Dougie. Fasten directly to the box. In this case, it is best to use the arc from the old sports bow. If there are none, then you can cut them yourself from wood.
- Shoulder crossbow. Often, the wizard for this element uses a conventional automobile springs, which must be pre-processed on a grinding machine.
- Bowstring. For the manufacture of such parts is best to use polyester, Kevlar or fastflytovy material. Then you should wind the threads of the bowstring, for which you must first stretch it. After winding the part to fix on the crossbow and adjust the level of tension. If the string is made correctly, she can make more than ten thousand shots. But as practice shows, the average operational capacity of this part is from three to four thousand shots.
- Lever, or trigger. It allows you to release the string and, accordingly, to make a shot. Such a mechanism is made of wood material and is built into the butt of the crossbow.
- Aim. No weapon can do without such an element, which includes two parts - the rear sight and the front sight.


The final step in the manufacture of the crossbow is pulling the string, which should be optimal. If the tension is weak, then the range of the boom will be minimal, and if it is too large, there is a risk of distorting or breaking the crossbow arc.
Mini crossbows from other scrap materials
If a wooden crossbow is a more professional product and can be used for sports purposes by both adults and teenagers, then crossbows made of paper, pencils or a Lego are intended for children from seven to twelve years old.
Also, do not forget that products made from seemingly safe materials can also be harmful to health if not properly handled.
Therefore, games with such homemade items should be supervised by adults.
Paper throwing weapons
To assemble such a toy with your own hands, you need to take care of the following materials and tools:
- fifteen sheets of paper (A4 format);
- three wooden sticks (you can from ice cream);
- string for bowstrings, best kapron;
- pencil;
- office knife or scissors;
- Scotch.
Step by step instructions for making a paper crossbow has the following form:
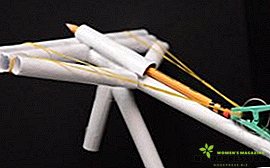 Five sheets of paper folded together and cut into two equal parts.
- The resulting halves are screwed on a pencil in order to create peculiar tubes that will need to be sealed with tape.
- Insert a stick into each tube no more than three centimeters. The remaining end cut off.
- To avoid damage to the tube of paper should be wrapped with tape (three to five layers).
- Insert the remaining sticks on the back of the tubules.
- At the junction, bend the tubes in half.
- Next is the base for which you first need to twist into a tube five solid sheets of paper.
- Attach pre-fabricated sidewalls (arcs) to the base with adhesive or adhesive tape.
- To the arcs tie a thread (string).
 Five sheets of paper folded together and cut into two equal parts.
Such a crossbow can be equipped with a sight, trigger and guides for arrows.
From pencils
For the manufacture of such a crossbow will need:
- four pencils;
- seven gum for money;
- one ballpoint pen;
- Scotch.
For the manufacture of such a "pencil" weapons, you must perform the following steps:
- Tie two pencils tightly together to make two elements of a crossbow.
- Further perpendicular to connect these two elements together.
- From above on pencils to wind a case from the handle. This will be the guide for the boom.
- As the bowstring all the same elastic bands are used, which are attached to the sides of the arcs and connected with each other with tape or thread.
As an arrow, you can use a stick rod.

From the designer "Lego"
To make a lego-crossbow, the first thing you need to purchase a designer, which is sold in almost any store children's goods. After the designer is purchased, you can proceed to its assembly, which is carried out according to the enclosed instructions.
It should be borne in mind that the configuration of the designer is different, and therefore the collected crossbows may differ from each other in size and principle of operation.
Boom making tips
When the crossbow is assembled, it is necessary to proceed to the manufacture of arrows, which should first of all be strong and reliable. To do this, you must observe the following nuances:
- choose the right material. In this case, it is best to use well-dried wood of pine, birch or spruce;
- avoid knotting on blanks for arrows;
- wood fibers should be located along the length of the future product;
- if the workpiece is uneven, you can try to level it, for this it must first be "heated" over the fire;
- be sure to make the plumage, which gives the arrow a stable and accurate flight;
- it is recommended to use wing feathers of goose, capercaillie, turkey or other large birds for plumage;
- it is very important that one arrow has feathers from one wing (right or left);
- You can use a metal plate or a nail as a tip, or you can do without it. But for this you need to gently plan out the end of the arrow (like sharpening a pencil);
- for the storage and transportation of arrows you need to use a quiver, which you can buy at a specialty store or make yourself;
- store arrows should be in a vertical position in places with moderate humidity, otherwise the product will be deformed.