Choosing and preparing a gift for mom for a birthday or any other holiday is not an easy task. Original and memorable will be a gift made by yourself.
In order to prepare such a craft, it is necessary to take into account the theme of the holiday, the preferences of the mother, and also proceed from their skills in handicrafts. This will be enough for making a gift. Having defined, you can proceed to the choice of material from which the craft will be made.
The most affordable and easy to use is paper. Depending on the type of crafts, in addition to the basic material, auxiliary tools will be required.
Making cards for Mother's Day
The card is a universal gift for any celebration. Her idea and design can be very diverse and depend only on your imagination. A bright and original handmade greeting card made by you will be a wonderful gift for Mother's Day.
Before you begin, you need to choose the color solution and the filling of the front side of the paper craft, as well as choose the style in which it will be executed. In the creation of the proposed card uses a few simple elements of technology quilling. These elements are simple, and you should not be afraid of working with them.
To work will require:
- thick light paper or cardboard;
- preparation for a card;
- a sheet with a printed inscription;
- colored paper or for quilling;
- scissors;
- glue stick or PVA;
- wooden skewer or toothpick;
- simple pencil;
- eraser.

Armed with the idea, the necessary materials and preparing the workplace, you can begin to work.
First you need to choose the size and prepare the basis for the postcard. On a light sheet of paper or cardboard, draw a mock-up of a postcard in a spread and draw a fold line. All lines should be dim. Then cut along the contour and gently bend in half. Making sure that the card turned out smooth, you can erase the auxiliary lines.
If you have a blank, then you don’t need to do anything else and you can get down to the main job.
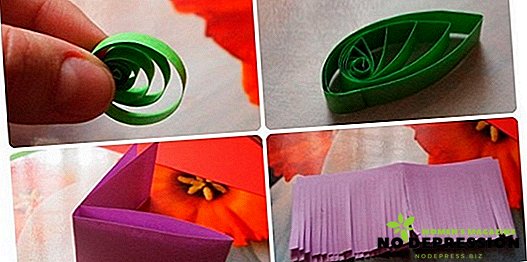
To create flowers, you should use ready-made paper for quilling or cut the color in length into thin strips as follows:
- green - for curls and foliage 1 cm wide;
- yellow, red or orange - for the core of a flower 0.5 cm wide;
- red, lilac, blue - for petals with a width of 3 to 5 cm.
Forms, sizes and colors may vary according to your wishes.
To create curls and leaves, green paper must be wound tightly on a skewer or toothpick, then remove it and give it the necessary shape.

You can start making petals-fringe. To save time, the sheet should be bent two or four times, then not completely cut, leaving about 1 cm. The core is made in the same way as curls, but it is made tighter and is fixed immediately.
Having prepared the elements of the flower, you can begin assembly. Petals are glued to the finished core in a circle, then the flower is given the desired shape by unbending the paper from the center.

Other flowers are collected in a similar way.
Having prepared all the necessary elements, you can begin to assemble the postcard. To do this, on the front side in the middle of a sheet is glued with the inscription, after all the decorative elements are fixed.

Postcard is ready!
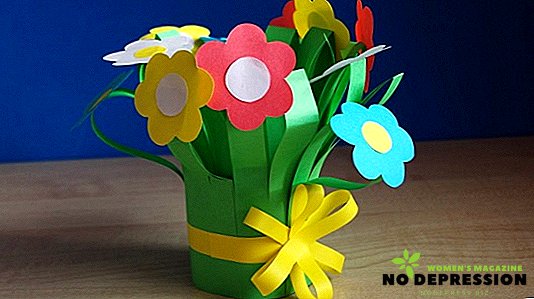
Bulk corrugated paper flower
Flowers presented for a holiday or just like that, always cheer up any woman. Flowers from paper, as compared to living ones, will also please the hostess with their beauty for a long time and will not require additional care.
To create such crafts will be required:
- Corrugated paper of two or more colors (green and fuchsia);
- long wooden skewers;
- tape-tape in green paper color;
- glue;
- thin wire;
- sheet of paper for preparation;
- pencil;
- safety pins;
- thick cylindrical object.
To begin with, we will prepare a blank-petal of arbitrary shapes and sizes using a white sheet and a pencil.
Fuchsia corrugated paper is cut into rectangles corresponding to the size of the workpiece, and secured with safety pins. Cut along the contour. We perform this operation several times until a sufficient number of petals are obtained.

The stem of the future flower is prepared as follows: several wooden skewers are covered with a tape.
From green corrugated paper you need to cut a few leaves, corresponding to the size of the flower. Wire also wrapped with tape and glue to the sheet.

Now proceed to the preparation of the petals. They need to give a realistic look, for this they need to stretch their hands from the center, giving a rounded shape. And twist the tops of the cylindrical object, as shown in the photo.
Getting to the collection of the flower.
On the prepared stem with teip-tape we fix alternately the petals.

We do this with every petal. Attach the elements you need in a circle and not allow unevenness of their location. Gradually, the volume will increase, and the flower will look like a real rose.
To create an authentic image of a flower, it is necessary to cut the sepal and fix it in a circle, as well as attach the finished sheet. All actions should be carried out with the help of tape tape.

Bulk rose will be an interesting and original addition to any interior.
A bouquet of candy with their own hands
Acquainted with the technique of making colors of corrugated paper, you can try to make a flower with candy. The hand-made of such flowers will not only please with its appearance, but will also be a delicious addition to tea drinking. Taking out candy, you can not worry about the integrity of the bouquet and flowers, they are specifically designed for this.
For such crafts will need:
- crepe paper of two colors (green and pink);
- candies;
- glue gun;
- scissors;
- wooden skewers;
- a thread;
- organza green;
- tape tape;
- basket;
- oasis;
- beads;
- nippers;
Choosing sweets for such crafts, it is preferable to give a rounded shape. With such sweets it is easier to work and remove from the finished flower.
From pink paper, you need to cut the rectangles that are suitable for the selected candies. Then trim the edges, rounding the shape, and stretch from the center. In the resulting blank attach candy, pre-folding the upper tail. Using thread to fasten the candy in the flower.
To give a natural look to flowers from green paper you need to cut the sepals and fasten them around the flower with the help of a thread. The resulting excess paper needs to be cut. The resulting flower is fixed on a skewer with a glue gun. Using teyp-tape, close all the bonding points and the very skewer.
Such manipulations need to be done with all colors. Choose your own quantity, based on the size of the basket.

Having prepared the flowers, you can proceed to the decoration design. Cut the green organza into squares, fold as shown in the picture, and fix with tape-tape on the skewer.
Insert the oasis inside the basket, if it didn’t manage to find one, the foam will be suitable. But it needs to be painted over with paint or sealed with green paper.
The bouquet is ready for assembly.
Finished elements are inserted into the basket. You need to work carefully, leaving as few empty places as possible. To reduce the height of flowers or decorative elements can be using nippers.
Additionally, you can decorate with beads, butterflies or ribbons.

Delicious gift is ready!
A jar "101 reason why I love mom!"
In fact, there are many times more reasons to love your mother, but such a reminder will not be superfluous. Instead of reasons you can specify funny stories or funny occasions. Such a gift will not be ignored.
For its manufacture will need:
- glass jar;
- sheets of paper;
- tapes;
- glue;
- decorative items.
Causes or stories can be printed on the computer, then they will only need to cut.

If you write by hand, for this paper need to be cut into strips of optimal size. Finished sheets need to be rolled up and tied up with tape. Decoration banks, as the main title itself, can be any, the main thing - only the presence.
Having prepared all the necessary elements, you can proceed to the decoration.
Variants of decorative design such crafts enough, for example, instead of a glass jar, you can use the original cardboard box.
Box of scotch and paper
Paper crafts are not only beautiful, but also practical. From the remaining bushings of scotch tape, paper and decorative items, you can get a beautiful and original box.
To work will require:
- 2 sleeves for adhesive tape;
- scrapbooking paper;
- beer carton;
- PVA glue;
- decorative ornaments.

First, we will prepare all the necessary elements: from one sleeve, you need to cut a lid for a casket about 2 cm high. Circle the sleeves on the beer cardboard, cut it out and glue it, so you will get the bottom of the casket and the top for the lid. And at the same time from the decorative paper you need to cut an element that will line the bottom of the craft, glue it.
Getting to the design. The box and the lid need to be pasted over with paper for scrapbooking and fastened to the decor. An original and useful gift is ready!
A gift made with your own hands will be especially valuable for any mother. In addition to the practicality, beauty and originality of such crafts, its special value will be the attention and love with which it is made.
Photo ideas