The word "quilling" implies a paper-twisting process, which is a very well-known and easy way to create various paper crafts. This type of needlework allows you to create exclusive beautiful crafts, which can later be used as a decor. In addition, such beautiful paper products can be presented as a gift to both friends and unfamiliar people.
For self-made crafts of quilling, it is necessary to become more familiar with the materials used and the methods of modeling.
Quilling art
The technique of creating such creations is based on the binding of various skeins, curlicues and spirals, which are made of thin paper ribbons. This skill allows you to create the most unusual and beautiful paintings, toys, as well as original crafts in the form of animals and plants.
Quite a lot of masters use this technology to create similar creations from threads. To learn how to properly connect paper elements, you need to familiarize yourself with existing quilling schemes.
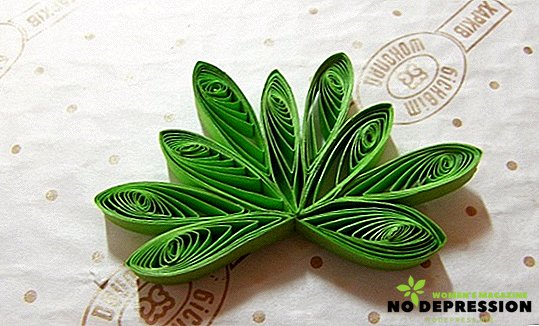
Paper quilling
 For the manufacture of paper masterpieces, you first need to purchase quilling paper, which is sold in specialized retail outlets. You can also make such material yourself.
The main thing is that the selected paper had the desired density, which should be at least one hundred grams per square meter. Such paper is perfectly curled and holds its shape well enough.
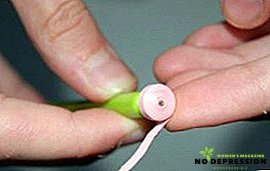
After a sheet of paper of the desired density is selected, it should be divided into small strips, which will then need to be wound on a base of small diameter. In this case, the base can be a regular toothpick, comb or awl. The end of the twisted skein is fixed with glue.
After making paper hanks, you can begin to create any figures or paintings.
Crafts from thread
Thread quilling is more complicated than paper quill and requires more assiduity and hard work from the master. Therefore, to make a beautiful openwork masterpiece, you need to gain some experience.
But at the same time even a child can master such crafts from threads.
Quilling from threads is a fascinating exercise that will make crafts more alive than from plasticine or paper. In addition, this exercise develops attention, imagination, perseverance and fine motor skills of hands.
Quilling components
To create any crafts, regardless of its subject matter, you need to learn a few basic rules. First of all learn to twist the workpiece. This work is very painstaking, but if you apply it, it will be quite pleasant and soothing.
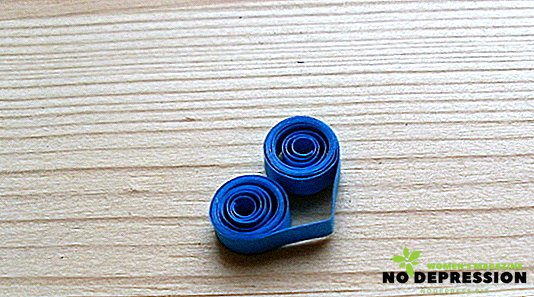
You also need to know that the basic element of quilling is a roll, which professionals divide into the following subspecies:
 tight;
- free;
- uncool
- curled
- heart;
- an arrow;
- a drop;
- crescent;
- an eye;
- snowflake;
- diamond;
- a triangle;
- star;
- square.
 tight;
All subspecies of the components of quilling directly affect the showiness, beauty and exclusivity of future crafts.
How to create masterpieces with your own hands
For beginners in the quilling business, it is recommended to work according to ready-made schemes and stencils, since it will be much easier for an inexperienced person to master these handicrafts with such blanks.
To make a quilling, usually use the following materials:
- paper;
- the cloth;
- plastic;
- tree.
At the same time, paper is the easiest to use.
Also, do not forget that quilling crafts are only blanks or basic elements of the finished masterpiece.
Necessary materials
To create a masterpiece from quilling does not need to spend money on expensive materials and equipment. Because everything you need is in almost every home. So, to make crafts from quilling, you need to prepare:
- Colored paper. The more colors there are, the more colorful the finished product will be.
- Glue. Best to use pva.
- Scissors. They must be sharp and at the same time safe for children.
- Ruler. For this case, the most common plastic tool is suitable.
- Tubule for juices.
- Toothpicks.
- Special mat for prototyping and cutting. If this is not available, the work surface can be covered with ordinary thick cardboard.
- Ready template to be pre-printed.
- Coloring tools. These can be colored pens, pencils or acrylic paints.

If you add fantasy and imagination to the above materials and tools, you can get real works of art that can decorate any corner of the house or apartment.
Quilling products
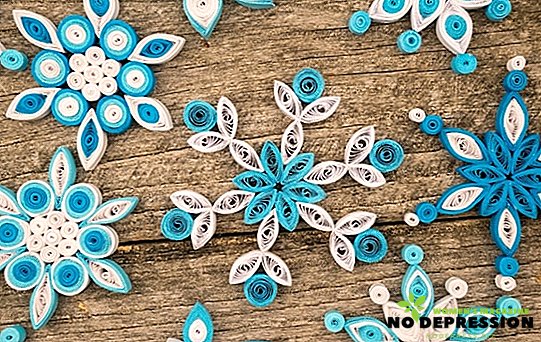
Based on this technology, you can create a lot of different crafts. Most often, quilling is used for the manufacture of the following decorative items:
- openwork paintings that can be presented to a person for any holiday or decorate any room with them;
- letters or numbers. Such crafts are preferred for birthday, because with them you can lay out the name and age of the birthday man;
- flowers, trees, animals or birds, which can also decorate any corner of the house or garden.

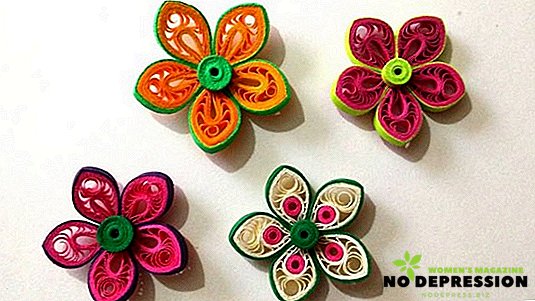
Templates and schemes
For beginners, first of all, you need a special stencil.

And for convenience, you should use ready-made templates:


Variants of crafts
Today, both on the Internet and in literature, there is a very large number of master classes for beginners who will help to make an original composition on this needlework technique. In addition, they will tell in detail how you can make a gift or decor for the New Year, women's holiday or other crafts for beginners and children from quilling.
New Year's
The most common product that you can personally make for the New Year holidays is a snowflake. In addition, this crafts because of the simplicity of its design is for beginners a kind of simulator.
To make the simplest and easiest snowflake you need to take care of the following materials:
- 9 × 12 centimeters of cardboard, preferably light blue;
- glue for paper. Best of all if it is PVA;
- rhinestones or other shiny items for decoration;
- toothpick, which will play the role of the basis for creating paper spirals (rolls).
In addition to the above materials, you will need to have on hand a ruler, pencils, stationery knife or scissors.
After all the materials and tools have been prepared, you can proceed to the manufacture of the elements of which the finished snowflake will actually consist. To do this, it is necessary to measure out certain parts of the cardboard, cut them, roll them into rolls:
- For large tears, four strips of eight centimeters are cut out.
- For small tears, four strips of six centimeters are cut out.
- For circles - eight and a half strips of three and a half centimeters.
- For diamonds - four and a half strips of four centimeters.
Then all the paper blanks obtained are twisted and then fastened together as follows:
- make a peculiar flower by alternating small and large tears. All elements are bonded with glue;
- attach circles and diamonds to the edges of large tears;
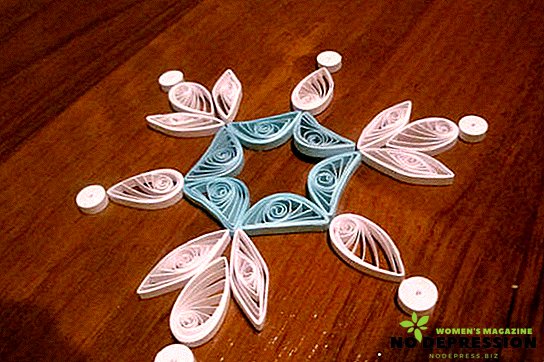
- place rhinestones in the center of the finished product;


Attach a capron thread to the finished product, which will allow you to hang the resulting snowflake anywhere.
You can also make a beautiful rooster, and the instructions are very simple:
- For the comb, twist in the form of droplets five blanks of red color.
- The eyes should be made of thick rolls of black, white and orange.
- The beak, head and neck of the bird are recommended to be made from white and yellow blanks in the form of drops.
- The body, wings and legs fill with spirals of different colors, while their location should be chaotic.
- Tail to perform from multi-colored droplets.
Fastening and connection of all elements is made using office glue.
Crafts for Women's Day March 8
Every woman, regardless of her age likes to receive gifts. Especially expensive will be the gift that is made by hand.
For this purpose, the best flowers from quilling, which will look great on a postcard. To make such an exclusive gift with your own hands, you need to purchase colored paper, scissors, toothpicks and glue. Then everything is done in the following sequence:
- From paper to wind tight multi-colored rolls, then make spirals, and from them - drops.
- Make a free spiral. That it will be the middle of the flower.
- Put a small amount of glue on the cardboard (postcard), attach a pre-made floral center.
- Around the middle with glue to attach drops. It will be flower petals.
- Glue a strip of green paper to the bottom of the resulting flower. In this way, the stem will be formed, and then add leaflets to it (green elements in the form of drops).


When the glue is dry, the resulting card can be used for its intended purpose.
Crafts for kids
For children, there are so many different master classes for making crafts from quilling. One of the easiest products with their own hands is considered a butterfly.
For its production will need all the same stationery devices as for the crafts described above. In addition, you need to prepare eight pink, the same red and two crimson stripes measuring 29 × 3 centimeters.
Then the whole process of creating a butterfly is carried out in the following order:
- A triangle is cut from the paper of the desired density, the base of which will be three centimeters, and the height - nine centimeters.
- Starting from the base, the triangle is wound on a toothpick.
- To the received body you need to attach the antennae of a different color.
- Wings are made further. Drops curl from eight spirals.
- The resulting drops are glued together by three pieces and separately by two pieces (parts of the wings will be obtained).
- Each blank is glued over with a strip of bright color.
- Two spirals are formed from the yellow stripes, to which large and small parts of the wings previously harvested are attached.
- At first, the butterfly body is glued to the cardboard, and then the wings.
The handicraft is ready.