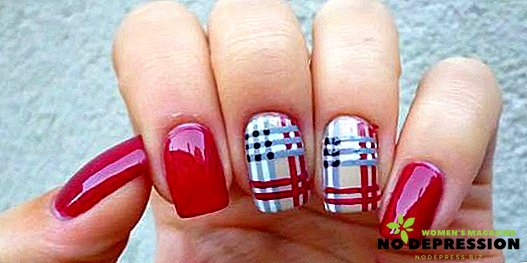
Beautiful manicure is an important factor that men pay attention to. Beautiful and well-groomed nails perfectly characterize a woman and her desire (ability) to look after herself. Not everyone can afford walking in salons, but even one who has never done this can make a manicure and draw a simple picture.
Where to start - the necessary materials and tools
Any drawing on the nails will not look well-groomed and ugly, if they are sloppy or broken, and the cuticle will be sloppy burrs. Therefore, the first thing you need to start any masters of nail art is to make a manicure beautifully and with high quality. As soon as the nails are in order, you can start drawing.
But as a decorating materials, you can use everything from special stickers to feathers and rhinestones.
The list of materials and tools that will be needed in the process is as follows:
- wooden sticks with different tips;
- Scotch;
- special thin brushes;
- needle;
- special powder with sparkles;
- nail stickers;
- foil and glue;
- pebbles;
- rhinestones or small beads;
- threads of different thickness;
- varnishes of various colors;
- acrylic paints;
- toothpick;
- dots;
- sponge
The selection of materials and tools is easier to do when you already have plans and an exact scheme of drawings. Well, when the last preparations are completed, you can be patient and begin.

Simple toothpick drawing on beginner nails
Many begin to comprehend the art of nail art with a very small set of tools. Simple drawings can be made with only a toothpick and multi-colored varnishes.
Valentine's day drawing
This simplest drawing is done easily and quickly. And you can draw it for the holiday of all lovers, and on weekdays. It looks very neat and beautiful on the nails of any length.
You will need a toothpick and two varnishes in different colors.
- Cover the nails with the main color, it is desirable to use a dark solid color;
- Red or pink varnish pour (a small amount) on a piece of paper;
- Toothpick put two points;
- To hold from each of them neat strips down so that they are connected and a heart comes out;
- Dry and coat with clear varnish on top.

Schemes for pictures using a toothpick
With these schemes, you can perform any pattern with a regular toothpick. It is necessary to use from 2 different colors of nail polish. It is enough to cover the nail plate with one color, put dots with another and lead with a toothpick from one point to another, following the diagrams in the figure.

Simplest Needle Nail Art For Beginners
To create more accurate drawings, draw thin lines and draw small details, a needle is best suited.
Flower pattern
This detailed scheme of floral pattern. You can draw it on any length, and changing colors every time you create a new picture.

Need a needle, red and white, flesh-colored lacquer or base.
- Coat the nail plate with a flesh-colored lacquer or use a special transparent base;
- Red varnish on the tip of the plate put down six points in a circle. Do not make them very liquid, so they do not flow;
- For convenience, you can pre-pour the varnish on the paper or plastic cap;
- Needle gently hold in the middle of each point from the center to the middle of the strip;
- Allow to dry;
- Put down 6 white dots in the middle of the nail;
- Repeat pattern;
- Use a needle to accurately mark a few dots of red lacquer from the flowers in line;
- The location of the flowers can be chosen at will.
Butterflies
Simple drawing attracts attention because of contrasting colors and interesting ideas.

You will need red and white varnishes, a needle.
- Gently apply red varnish in two layers on each nail;
- With a white lacquer brush, put the fat spots in the place where the butterflies will be located;
- Needle withdraw first large upper wings, and then small. Draw a small tail and antennae;
- If the white lacquer is not enough for the whole butterfly, gently take a small amount with a brush with a needle and continue drawing.
Nail art for beginners step by step
You can make beautiful drawings on nails and without needles with toothpicks; it is enough to buy a pair of varnishes with an ultrathin brush and use it to paint.
"Kedy"
Youth drawing is done using multi-colored varnishes and does not require special skills or effort. The only thing that will take is patience and time.

It will take 5 varnishes (more); white lacquer with a thin brush; black lacquer with a thin tassel.
- Each nail varnish so that you get five multi-colored nails;
- White varnish gently draw a sock each nail;
- Along the length of the sock put two lines of 4 strips;
- Gently connect all the strips diagonally, and the top two - in a straight line;
- Put the black dots over the white dots and draw a thin line in the middle of the “sock”;
- Fasten the top with a colorless varnish.
Moon manicure
This type of classic manicure appeared in the distant 60s and since then has not lost its appeal. It will suit both a young girl and an adult lady.

It will take two contrasting varnish; stickers stencils.
- Prepare the nails, removing from them the old coating and filed;
- Stick on the base of the sticker. You can use round stencils special for moon manicure, or you can take stencils for French manicure. In extreme cases, you can do with scotch;
- Stick the stickers so that they cover the base of the nail with a semicircle;
- Paint all two or three layers of the main color varnish;
- Dry;
- Carefully peel off the stickers and paint the semicircle with a different color varnish;
- You can experiment with colors, but you can not paint the remaining semicircle at all.
Drawing on nails with a brush for beginners
In specialized stores you can find many kinds of different brushes for painting on nails. They differ in length, thickness and shape. With their help, you can create masterpieces of nail art.
Drawing "Loneliness"
This is a drawing of increased complexity and you can start it already having experience in drawing. You will need several different brushes to perform.

You will need white, beige and blue varnishes; black lacquer with a thin brush; two thin tassels with a thin end.
- To begin with, cover the nail plate with a base beige lacquer and let it dry;
- Mentally draw a line on the nail, which will divide it in half;
- One of the halves painted blue lacquer. Dry;
- Paint the line between halves with black lacquer brush;
- Paint the second half with white lacquer and dry;
- On different halves a thin brush to draw the branches with contrasting varnishes. Dry;
- Cover with fixer.
Drawings with scotch on the nails for beginners
Regular adhesive tape can not only replace expensive stencils for French and moon manicures, but also help draw complex geometric patterns.
"Geometry"
Cut strips of ordinary scotch, fancifully superimposed on each other will eventually create an intricate geometry.

It will take two bright varnish and tape.
- Cover all the basics. Dry;
- From above to apply in two layers a varnish which will be color of a pattern;
- Dry;
- Stick two thin strips of adhesive tape crosswise;
- Top paint over two layers of primary color. Dry;
- Gently remove the strips;
- Paint over the top with a colorless varnish or fixer.
Drawing "Romance"
A simple and fast drawing, which is done using a stencil of scotch and two varnishes, can make any girl.

You will need a sharp knife, scotch tape, pink and white varnish.
- Paint your nails with pink varnish in two layers;
- Let your nails dry;
- Use a sharp knife to cut off a strip of tape of such width that it completely covers the nail;
- On a strip, cut a neat little heart;
- Stick the strip to where the heart should be;
- Paint the stencil white;
- Dry the drawing without removing the scotch;
- Gently remove the adhesive strip;
- Go through fixer.
Dots on nails for beginners
Dots is a special manicure tool that resembles a metal pencil with a small ball at the end. Ball and makes patterns. Today, a lot of drawings are performed with the help of dots technique.
"Bow"
Gentle manicure using a decorative element looks very nice on any length and shape.

You will need pink and purple varnishes; dots; label bow.
- Cover the nails with a base for manicure;
- Top two layers of pink lacquer;
- Purple neatly pour on a piece of paper or a plastic cover;
- Dots gently dip in a purple liquid and put dots of different diameters over the entire surface;
- Allow to dry completely;
- Stick on the ring fingers on the sticker;
- Go through the fixative for each nail.
Variants of drawings in the dots technique
Thanks to dots you can create any pictures that you can think of. It does not require a lot of knowledge or skill, enough experience and constant practice.

Due to the different diameters of the ball at the end of the dots, you can put different dots, blur them, connect and draw different lines across the entire surface of the nail. The main rule of work with dots is to paint on a still wet surface, preventing it from drying out.
How to make drawings on the nails with acrylic paints
Relatively recently in the art of nail art began to use acrylic paints. But it is they who provide the widest range of colors for nail artists, remain resistant to ultraviolet rays, retain their color for a long time and are absolutely resistant to moisture and a couple.
"Twigs"
This is one of the simplest techniques of drawing with acrylic paints.

You will need a varnish for the base; acrylic paints of two colors; thin brush.
- Apply the main varnish on the nails;
- From the lower left corner of the nail paint draw two thin curved lines along the entire length;
- The same color to draw the leaves on the branches;
- Paint over the middle of each sheet with a different color;
- Dry the paint;
- Cover the nails with a fixing base.
"Butterfly"
A bit complicated pattern, which may take more time to complete. But it looks very gentle and beautiful.

It will take 2 thin brushes; colorless base; black and pink acrylic paints; sparkles.
- Each nail cover with two layers of transparent base. Dry;
- In the middle of each nail, draw a thin curved line with black paint;
- Pink paint draw two wings - one is bigger, the other is smaller;
- Paint the wings with paint. Dry;
- Finish the black mustache butterfly;
- Place a small amount of nail polish on the two wings with a special glue;
- Dry glue;
- Cover each nail with two layers of fixative.
Other ways to paint on nails
There are plenty of additional ways to create a work of art on your nails. These include:
- Caviar manicure.
Such a manicure is performed with the help of special beads, which are brushed off on freshly painted nails and “pressed” into a still moist surface.
- "Velvet" manicure.
This is the latest discovery in the art of manicure. It is carried out with the help of a special "velvet" and an apparatus that as if sprays the material on the nail. At home, this way can also be used if you purchase a special nap.
In the next video - a few more options for simple drawings.