Due to the excellent characteristics and appearance of the laminate is incredibly popular. But in order for the floor to serve for a long time and not lose its properties, you need to know how to lay the laminate in such a way as to avoid serious mistakes.
Preparation is an important step when laying
No matter how much you want to do everything quickly, you should not forget about one important rule - the laying of any floor does not stand in a hurry. This is already a fairly quick job, but if you hurry, the laminate you have laid will not last long.
Because the first thing to do is to carefully prepare the foundation. Moreover, it is desirable to begin work before the purchase of laminate.
The first step is to inspect the base. The advantage of laminate can be called the fact that it can be laid on almost any basis, but it must meet several requirements.
For example, the surface must be level - small drops of up to 2 mm are allowed. Also on the ground there should be no hillocks or pits - it should be even. Otherwise, after laying the laminate will quickly appear unpleasant creak. Also, the base must be durable so that no loads will lead to the appearance of "waves".
 If you plan to lay the laminate on a concrete surface, it needs to be “patched”: remove cracks, gouges, and areas with a crumbling base.
If there is a lot of damage, you need to put aside the laminate and do some repairs — you will have to update the screed, for which you can use either a concrete solution or a special self-leveling fill.
You can also lay laminate on linoleum. But in this case, the coating should be even and complete: no scuffs, seams, hillocks. If the damage is too strong, you still have to remove the linoleum and lay the slats on the concrete base.
Many lay laminate on the old wooden floor. This is possible, but only if there are no creaking or damaged boards on the floor, there are no "unstable" areas, when the boards disperse, they do not sit well on nails. Any damage must be zashpatlevat, level the surface using a grinder.
To remove slight differences between the boards, you can use a plane, but it is best to cover the products with plywood or 1 cm thick OSB sheets. This material will not only achieve the required flatness, but also have a noise-insulating effect. On top of the product you need to lay a substrate of thick polyethylene film.
What you need to work
After purchasing the laminate, it must be freed from the film and packaging and left for a few days in the room where you will work. Due to this, the temperature, humidity of the laminate will even out - thanks to this, the installation itself will be easier, and the laid coating will last longer. While adaptation is taking place, you need to prepare the tools:
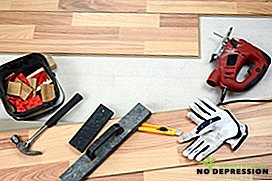 To cut the boards, you need a jigsaw and a hacksaw.
- You will also need tools for drawing and measuring: a tape measure, a square, a marker, etc.
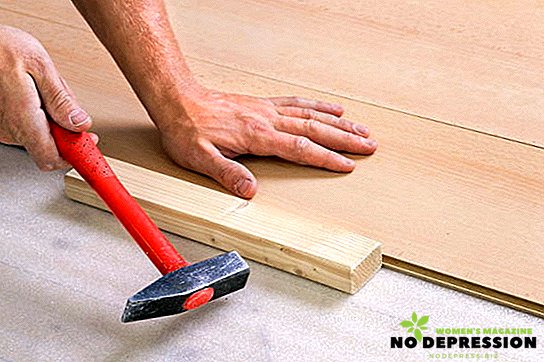
- For joining seams need a hammer, and preferably rubber or wood. If this is not the case, you can use the usual one, but you need to attach a special bar, this will avoid the appearance of damage on the boards.
- It also requires a V-shaped lever, which is needed to work with laminate in hard-to-reach places. Some use the mount instead, but only in this case there is a risk of damaging the walls.
- Prepare the required number of spacers that are needed to fix the boards at the required distance from the walls, to compensate for expansions, etc.
- Substrate on which the laminate is laid. It can be polymer or foil layer, cork. The material is spread over the entire base without overlap and gaps. To secure the seams better to use tape or tape.
 To cut the boards, you need a jigsaw and a hacksaw.
Choosing a laying scheme
To work as quickly and efficiently as possible, before the eyes of the master must necessarily be an approximate scheme of laying. What should be considered to avoid a number of mistakes that await newbies?
Long racks need to be laid in the direction of the sun's rays from the window to the walls of the room. In the opposite case, the seams on the surface will stand out strongly. The works themselves start from the corner, usually from the left.
Each subsequent row of lamellae will be stacked with an offset. When planning your work, remember that the last row of laminate should be at least 10 cm. If it turns out less, try to narrow the first row a little. Similarly, the installation is done in a room with corners.
Particular attention is paid to the locations of vertical risers. If you can not remove them temporarily, think over the scheme so that the risers fall on the junction of boards. In this case, cutting the hole and installing the coating will take place without problems. Despite the fact that the laminate has a small thickness, it can sometimes interfere with the opening of doors. Try to think about this moment in advance and, if necessary, shorten the door leaf a little.

And only after the training, you can proceed to installation.
The basic methods of laying laminate do it yourself
Laminate of different types differs in the way of pairing between them. There are options, for example, when it is necessary to ensure the uniformity of the surface, for which the joints are necessarily glued. Panels with locks are installed in another way.
Installation type "Cliсk"
The main feature of this connection is that it is made at a certain angle between the boards themselves. The works are carried out as follows: the panel to be installed at a certain angle is inserted with a spike into the groove of the panel already laid. When turning the lock, it snaps into place with a distinctive sound, ensuring a reliable connection. But at the same time it will also be very easy to dismantle the board - you need to slightly raise the laminate.
Installation is carried out from the first row: the entire strip is assembled, it is laid along the wall. The next row is collected in the same way, but the material is set with a slight offset. And only after complete assembly, the rows are joined. The rest of the rows are laid in the same way, and before each assembly it is necessary to check the cleanliness of the grooves: there should be no debris or fine dust in them.

System "Loсk"
The grooves and spikes with this connection are located in the same plane, they have protrusions and grooves for fixation. Laying in this way will not be as reliable and durable as with the "Cliсk" system, but at the same time it will be very difficult to dismantle the panels.
Laying is carried out as follows:
- The boards of the first row are connected on the front side, for which you need to tap them with a hammer. And wedging is carried out from the walls of the room.
- Installation is carried out in steps.
- Installing the second row begins with the first laminate board from the wall: the spike is inserted into the groove of the previous lamella.
- The next panel is installed in the same way, while it needs to be tapped from both sides, both along the long and on the front side. And so on to the very end.
When working, control the force of a blow with a hammer, otherwise you can seriously damage the boards.

Glue mounting
Boards designed for mounting on glue, have high rates of water resistance and durability. The disadvantages include the fact that the installation in this way is quite complicated, and it is impossible to dismantle without damaging the panels themselves. Also for laying you need a special glue - you can not use the usual PVC glue, because it will not be able to properly secure the connection.
On such boards there are grooves and spikes, but their main task is the alignment of the panels, since there is no special lock part.

The laying technology itself is practically no different from the installation system with locks "Lek", but the main feature is that before installation all the grooves need to be smeared with glue. Moreover, its surplus after installation, it is necessary to remove a damp clean cloth.
After mounting 2-4 rows, you need to make a technological break for several hours - for the polymerization of the adhesive solution. After this work continues. When the installation of the last row is completed, it is necessary to remove the wedges over the entire area of the room. It remains only to install the baseboards, close the junction of the boards to other coatings with overlays.
Having completed the installation, you can proceed to other work on the arrangement of the room.