Snowflake is one of the most popular symbols of winter and New Year. You will learn how to easily draw a snowflake on paper with a simple pencil. You will also learn how to gradually make a holiday manicure with the image of a snowflake and how to decorate the windows on New Year's Eve.
How to draw a beautiful little snowflake: a phased description
On paper in pencil
To draw a beautiful snowflake with a pencil on paper, you need to pay special attention to the base. The most important thing in a snowflake is symmetry and evenness of lines. We need a sheet of white paper, an eraser and a simple pencil.
First, let's draw a small circle in the middle of the paper sheet. After that, proceed to drawing the base. From the middle of the circle draw six rays of the same length. It is necessary that the angle between the rays was also the same.

Next, mentally imagine a hexagon with our circle in the center and connect the vertices of this figure. Pencil the corners with short strokes over the vertices of the hexagon with a pencil. They will look like original roofs of houses.

We connect the short corners with the center of the crystal, drawing smooth lines from the tips of the corner to the central circle. Multiple pentagons narrowed to the center of the crystal are obtained. From these pentagons we draw lines connecting at the ends of the main rays of the snowflake. Rays turn into sharp elongated tips.

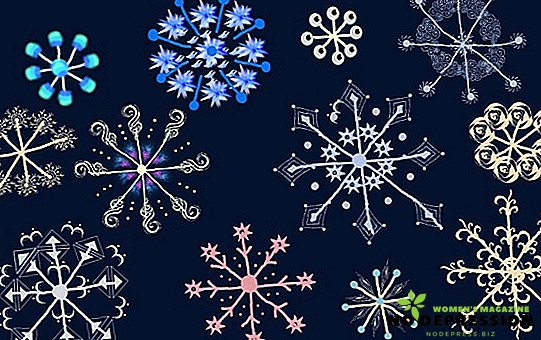
Here is the "frame" of our snowflake. Then you can show your imagination and draw various branches from the main lines. You can draw different curlicues to get a slightly openwork pattern, and you can only stick to straight lines and corners. The main thing is that the rays are identical. Excess lines can be erased with an eraser.

The more strokes, corners, twigs and curlicues on the snowflake, so it is more voluminous. Rays may not necessarily be six, you can draw three or, conversely, eight. But a small snowflake should not be painted with an intricate design.
In order to make the drawing look more realistic, you can shade the rays with a simple pencil and also paint it with blue.
On the nails
Patterns on the nails in the form of snowflakes - a fairly popular version of the winter manicure. The most famous symbol of winter depicted on the nails is not so difficult. With due diligence and compliance with certain subtleties, any girl will cope with this.
There are several ways to depict miniature snow crystals on nails. But first you need to prepare your nails for applying art. First, you need to file the irregularities of the nail plate with a ceramic or glass nail file. Then the surface of the nails must be polished with a special soft baf. Also, nails must be degreased with alcohol or acetone.

Ways to image beautiful snowflakes on the nail: a needle or a toothpick, a dots, a brush:
- If the snowflake is drawn with a needle or toothpick, then the drawing should be applied on a dry transparent or color base. Dip a needle or toothpick in a varnish and gently put a small dot on the surface of the nail. Then draw a cross with a dot in the center. Next, over the cross draw miniature lines in the shape of "x". And already from these rays we take away small strokes so that the snowflake is fluffy.
- With the help of the dots, you can represent the crystals in the dotted technique. To do this, we put a larger point in the middle of the tool, and small points around it. After we connect alternately small points with the central one. The size of the snowflake depends on the size of the ball on the instrument.
- With the help of a fine brush, we can draw a snow symbol with lines of different thickness. Apply the picture to a dried base. We draw a straight cross, diagonal above, we supplement it with strokes and points on the tips. This method requires greater accuracy and care.
Snowflakes on the nails can be placed differently. You can make such patterns not on all fingers, but on one or two, depicting one large snowflake. You can not draw a whole crystal, and its half. There are many options, you just have to turn on the imagination.
Toothpaste on the window
Snowflakes on the windows - a great decorative ornament for the New Year. This beauty is very easy to do with ordinary toothpaste. All you need to decorate the windows is a white toothpaste without additions and blotches, medium density paper, scissors, a sponge for washing dishes or a piece of foam rubber.
 First, you need to cut out snowflakes of the shape you like from paper.
It is better to take not too thick, but not too thin paper, such that it can be glued to the glass with water, and at the same time it does not tear.
If you do not want to cut yourself, or you do not know how to do this, then stencils for every taste are sold in the store.
After the snowflakes are ready, wash the glasses well and moisten them with a little water. Until the window is dry, you can stick snowflakes to the glass.
Additionally, you can secure them with scotch tape. Then we wait about twenty minutes to dry the window.
In any bowl, mix the toothpaste with water. The consistency should not be too thin, it is better that the paste and water were equal. But you can experiment with different ratios, then the effect will be different, more saturated or less saturated.
Next, with a damp sponge dipped in a solution with toothpaste, blot the glass with the snowflake and space around it in short movements.

You can make different saturation of the background in different corners of the window, then there will be a gradient effect, as if the window is frozen. Snowflakes can be made in different sizes, or in one window to place one huge snowflake.
Beautiful patterns of snowflakes are in demand in different areas of life: these are simple children's drawings, and manicure, and decorative home decoration. And most importantly - it is an affordable tool that allows you to bring a little winter aesthetics into your life. In addition, to make decoration with the use of a snow pattern is possible for almost everyone, and in order to do so, a minimum of funds will be needed.
What else can be drawn snowflakes